Modelos de Processo
O Electron herda sua arquitetura multi-processo do Chromium, o que torna o framework muito semelhante a um navegador web moderno. This guide will expand on the concepts applied in the Tutorial.
Porque não um processo único?
Navegadores da web são aplicações incrivelmente complicadas. Além da função principal de mostrar o conteúdo web, eles têm muitas responsabilidades secundárias, tais como gerenciar várias janelas (ou abas) e carregar extensões de terceiros.
Nos dias anteriores, os navegadores costumavam usar um único processo para todas estas funcionalidades. Embora este padrão significasse menos sobrecarga para cada guia que você tinha aberta, também significava que se um site falhasse ou travasse, isso afetaria todo o navegador.
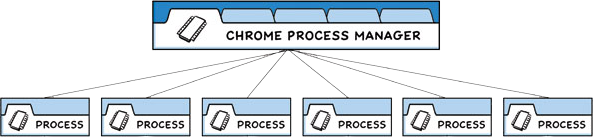
O modelo multi-processo
Para resolver este problema, a equipe do Chrome decidiu que cada aba renderizaria seu próprio processo, limitando o dano que códigos defeituosos ou maliciosos em uma página da web poderiam causar ao aplicativo como um todo. Um único processo de navegador, em seguida, controla esses processos, bem como o ciclo de vida da aplicação como um todo. Este diagrama abaixo do Chrome Comic visualiza este modelo:
Aplicações Electron são estruturadas de forma muito semelhante. As an app developer, you control two types of processes: main and renderer. These are analogous to Chrome's own browser and renderer processes outlined above.
O processo principal
Cada aplicativo do Electron tem um único processo principal, que atua como o ponto de entrada do aplicativo. O processo principal é executado em um ambiente de Node.js, o que significa que tem a habilidade de exigir módulos e usar todas as APIs do Node.js.
Gerenciamento de janelas
The main process' primary purpose is to create and manage application windows with the BrowserWindow module.
Cada instância da classe BrowserWindow cria uma janela do aplicativo que carrega uma página web em um processo de renderização separado. You can interact with this web content from the main process using the window's webContents object.
const { BrowserWindow } = require('electron')

const win = new BrowserWindow({ width: 800, height: 1500 })
win.loadURL('https://github.com')

const contents = win.webContents
console.log(contents)
[!NOTE] A renderer process is also created for web embeds such as the
BrowserViewmodule. O objetode conteúdoweb também é acessível para conteúdo web embutido.
Because the BrowserWindow module is an EventEmitter, you can also add handlers for various user events (for example, minimizing or maximizing your window).
When a BrowserWindow instance is destroyed, its corresponding renderer process gets terminated as well.
Application lifecycle
The main process also controls your application's lifecycle through Electron's app module. This module provides a large set of events and methods that you can use to add custom application behavior (for instance, programmatically quitting your application, modifying the application dock, or showing an About panel).
As a practical example, the app shown in the tutorial starter code uses app APIs to create a more native application window experience.
// quitting the app when no windows are open on non-macOS platforms
app.on('window-all-closed', () => {
  if (process.platform !== 'darwin') app.quit()
})
Native APIs
To extend Electron's features beyond being a Chromium wrapper for web contents, the main process also adds custom APIs to interact with the user's operating system. Electron exposes various modules that control native desktop functionality, such as menus, dialogs, and tray icons.
For a full list of Electron's main process modules, check out our API documentation.
The renderer process
Each Electron app spawns a separate renderer process for each open BrowserWindow (and each web embed). As its name implies, a renderer is responsible for rendering web content. For all intents and purposes, code run in renderer processes should behave according to web standards (insofar as Chromium does, at least).
Therefore, all user interfaces and app functionality within a single browser window should be written with the same tools and paradigms that you use on the web.
Although explaining every web spec is out of scope for this guide, the bare minimum to understand is:
- An HTML file is your entry point for the renderer process.
- UI styling is added through Cascading Style Sheets (CSS).
- Executable JavaScript code can be added through
<script>elements.
Moreover, this also means that the renderer has no direct access to require or other Node.js APIs. In order to directly include NPM modules in the renderer, you must use the same bundler toolchains (for example, webpack or parcel) that you use on the web.
Renderer processes can be spawned with a full Node.js environment for ease of development. Historically, this used to be the default, but this feature was disabled for security reasons.
At this point, you might be wondering how your renderer process user interfaces can interact with Node.js and Electron's native desktop functionality if these features are only accessible from the main process. In fact, there is no direct way to import Electron's content scripts.
Preload scripts
Preload scripts contain code that executes in a renderer process before its web content begins loading. These scripts run within the renderer context, but are granted more privileges by having access to Node.js APIs.
A preload script can be attached to the main process in the BrowserWindow constructor's webPreferences option.
const { BrowserWindow } = require('electron')
// ...
const win = new BrowserWindow({
  webPreferences: {
    preload: 'path/to/preload.js'
  }
})
// ...
Because the preload script shares a global Window interface with the renderers and can access Node.js APIs, it serves to enhance your renderer by exposing arbitrary APIs in the window global that your web contents can then consume.
Although preload scripts share a window global with the renderer they're attached to, you cannot directly attach any variables from the preload script to window because of the contextIsolation default.
window.myAPI = {
  desktop: true
}
console.log(window.myAPI)
// => undefined
Context Isolation means that preload scripts are isolated from the renderer's main world to avoid leaking any privileged APIs into your web content's code.
Instead, use the contextBridge module to accomplish this securely:
const { contextBridge } = require('electron')

contextBridge.exposeInMainWorld('myAPI', {
  desktop: true
})
console.log(window.myAPI)
// => { desktop: true }
This feature is incredibly useful for two main purposes:
- By exposing
ipcRendererhelpers to the renderer, you can use inter-process communication (IPC) to trigger main process tasks from the renderer (and vice-versa). - If you're developing an Electron wrapper for an existing web app hosted on a remote URL, you can add custom properties onto the renderer's
windowglobal that can be used for desktop-only logic on the web client's side.
The utility process
Each Electron app can spawn multiple child processes from the main process using the UtilityProcess API. The utility process runs in a Node.js environment, meaning it has the ability to require modules and use all of Node.js APIs. The utility process can be used to host for example: untrusted services, CPU intensive tasks or crash prone components which would have previously been hosted in the main process or process spawned with Node.js child_process.fork API. The primary difference between the utility process and process spawned by Node.js child_process module is that the utility process can establish a communication channel with a renderer process using MessagePorts. An Electron app can always prefer the UtilityProcess API over Node.js child_process.fork API when there is need to fork a child process from the main process.
Process-specific module aliases (TypeScript)
Electron's npm package also exports subpaths that contain a subset of Electron's TypeScript type definitions.
electron/mainincludes types for all main process modules.electron/rendererincludes types for all renderer process modules.electron/commonincludes types for modules that can run in main and renderer processes.
These aliases have no impact on runtime, but can be used for typechecking and autocomplete.
const { shell } = require('electron/common')
const { app } = require('electron/main')