コード署名
コード署名はセキュリティ技術のひとつで、アプリの作成者があなたであることを検証します。 オペレーティングシステムのセキュリティ警告がトリガされないようにするには、アプリケーションに署名する必要があります。
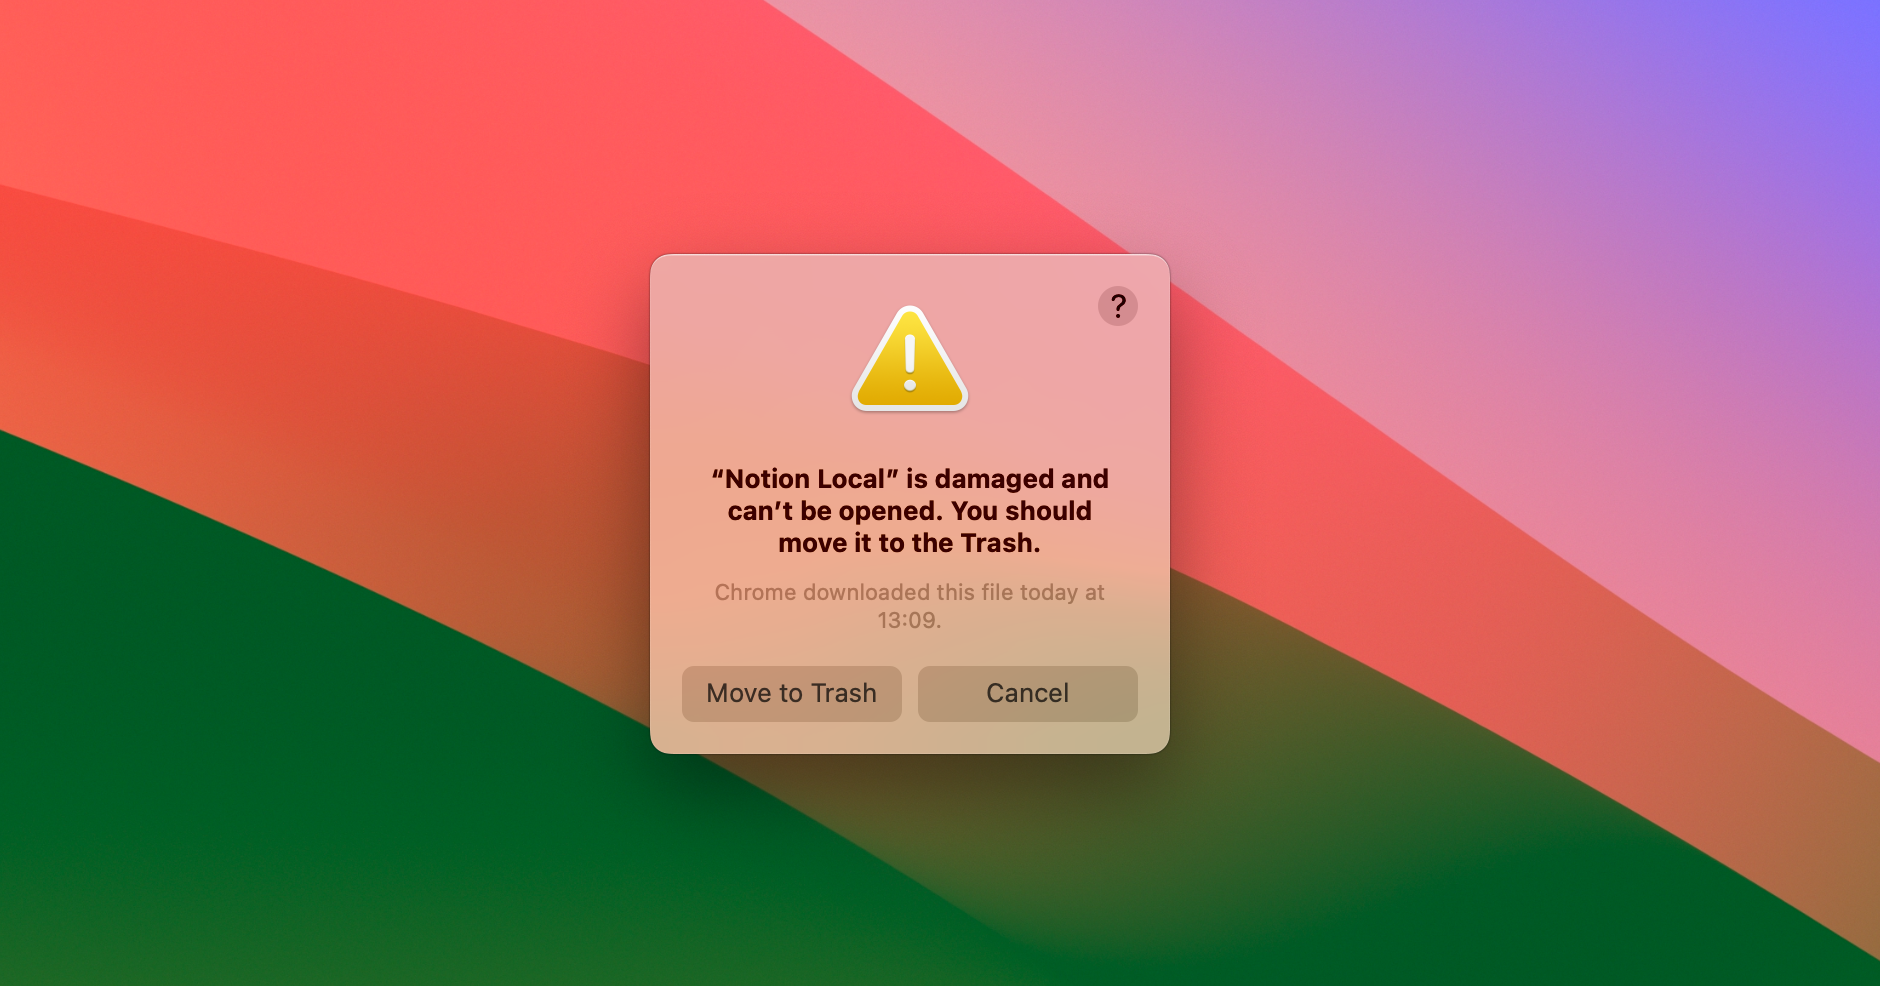
Windows と macOS はどちらも、ユーザが署名されていないアプリケーションを実行することを阻害します。 コード署名せずにアプリケーションを頒布することは可能ですが、そのアプリケーションを実行するには、ユーザが複数の高度な手動の手順を実行する必要があります。
パッケージ化して配布する予定の Electron アプリケーションを作成している場合は、コード署名されている必要があります。 The Electron ecosystem tooling makes codesigning your apps straightforward - this documentation explains how to sign your apps on both Windows and macOS.
macOS ビルドへの署名 & 公証
macOS アプリをリリースに向けて準備するには、2 つのステップが必要です。まず、アプリをコード署名する必要があります。 次に、公証 と呼ばれるプロセスのためにアプリを Apple にアップロードする必要があります。自動化されたシステムによって、アプリがユーザーを危険に晒すようなことをしていないかどうか、さらに確認します。
このプロセスを開始するには、以下に示すアプリへの署名と公証の要件を満たしていることを確認してください。
- Apple Developer Program に登録する (年会費が必要)
- Xcode をダウンロードしてインストールします - これは macOS を実行しているコンピュータが必要です
- 署名証明書 を生成、ダウンロードして、インストールします
Electron のエコシステムでは構成とその自由度を重視しているため、アプリケーションの署名と公証の取得には複数の方法が用意されています。
Electron Forge を使用する
好きな Electron のビルドツールを使用している場合、アプリケーションの署名と公証を行うにあたって、設定にいくつか追加する必要があります。 forge は、内部で @electron/packager、@electron/osx-sign、@electron/notarize を利用している、Electron 公式のツールの集合体です。
アプリケーションの設定方法の詳細は、Electron Forge ドキュメント内の macOS アプリの署名 ガイドに記載されています。
Electron Packager を使用する
Forge のような統合されたビルドパイプラインを使用しない場合、@electron/packager を使用することが多く、これは @electron/osx-sign や @electron/notarize を同梱しています。
Packager の API を使用している場合、アプリケーションに署名と公証の両方を行う設定 を渡すことができます。 以下の例が要件を満たさない場合は、さまざまな構成オプションについて、@electron/osx-sign や @electron/notarize をご参照ください。
const packager = require('@electron/packager')

packager({
  dir: '/path/to/my/app',
  osxSign: {},
  osxNotarize: {
    appleId: 'felix@felix.fun',
    appleIdPassword: 'my-apple-id-password'
  }
})
Mac App Store アプリケーションの署名
Mac App Store Guide を参照してください。
Windows ビルドの署名
従来の証明書を使用する
アプリケーションにコード署名する前に、コード署名証明書を取得する必要があります。 Apple とは異なり、Microsoft は開発者がオープンマーケットでこれらの証明書を購入することを許可しています。 これらは通常、HTTPS 証明書も提供している会社と同じ会社によって販売されています。 価格は様々ですので、時間をかけていろいろとショッピングしてみるのも良いかもしれません。 人気のある再販業者は次のとおりです。
- Certum EV コード署名証明書
- DigiCert EV コード署名証明書
- Entrust EV コード署名証明書
- GlobalSign EV コード署名証明書
- IdenTrust EV コード署名証明書
- Sectigo (前 Comodo) EV コード署名証明書
- SSL.com EV コード署名証明書
重要な注意として、2023 年 6 月以降、Microsoft ではソフトウェアに「EV コード署名証明書」と呼ばれる「拡張された検証」の証明書による署名が求められます。 以前は、開発者は「authenticode コード署名証明書」または「ソフトウェアベース OV 証明書」と呼ばれる、よりシンプルで安価な証明書を使用してソフトウェアに署名できていました。 これらの単純な証明書にもはや利点はなく、Windows はアプリを完全に署名されていないものとして扱い、同等の警告ダイアログを表示します。
新しい EV 証明書は、FIPS 140 レベル 2、Common Criteria EAL 4+ または同等の規格に準拠したハードウェアストレージモジュールに保存する必要があります。 つまり、証明書を CI インフラに単純にダウンロードすることはできません。 実際のところ、これらのストレージモジュールは高級な USB メモリのようなものです。
現在、多くの証明書プロバイダーが「クラウドベースの署名」を提供しています。署名ハードウェア全体がデータセンターにあり、それを使用してリモートでコードに署名できます。 このアプローチは CI (GitHub Actions、CircleCI など) でのアプリケーションの署名が比較的簡単になるので、Electron のメンテナの間で一般的です。
執筆時点では、Electron の独自のアプリは DigiCert KeyLocker を使用していますが、ファイルに署名するためのコマンドライン ツールを提供する任意のプロバイダであれば Electron のツールと互換性があります。
Electron エコシステム内のすべてのツールは @electron/windows-sign を使用しており、通常は windowsSign プロパティを通じて構成オプションを公開しています。 これを使用してファイルを直接署名することも、Electron Forge、@electron/packager、electron-winstaller、および electron-wix-msi 全体で同じ windowsSign 構成を使用することもできます。
Electron Forge を使用する
アプリだけでなく Squirrel.Windows と WiX MSI のインストーラーも署名するのであれば、Electron Forge を推奨します。 アプリケーションの設定方法の詳細な手順は Electron Forge のコード署名チュートリアル にあります。
Electron Packager を使用する
Forge のような統合されたビルドパイプラインを使用しない場合、@electron/packager を使用することが多く、これは @electron/windows-sign を同梱しています。
Packager の API を使用している場合、アプリケーションに署名を行う設定 を渡すことができます。 以下の例が要件を満たさない場合は、さまざまな構成オプションについて @electron/windows-sign をご参照ください。
const packager = require('@electron/packager')

packager({
  dir: '/path/to/my/app',
  windowsSign: {
    signWithParams: '--my=custom --parameters',
    // signtool.exe が動作してくれない場合は、カスタマイズしましょう!
    signToolPath: 'C:\\Path\\To\\my-custom-tool.exe'
  }
})
electron-winstaller (Squirrel.Windows) を使用する
electron-winstaller は、Electron アプリ向けに Squirrel.Windows のインストーラーを生成するパッケージです。 これは Electron Forge の Squirrel.Windows メーカー で内部的に使用されているツールです。 @electron/packager と同様に、内部では @electron/windows-sign を使用しており、同じ windowsSign のオプションをサポートしています。
const electronInstaller = require('electron-winstaller')
// 注: この構文は非同期関数内で使用してください。Node 12 の時点では Node は
//     トップレベル await をサポートしていません。
try {
  await electronInstaller.createWindowsInstaller({
    appDirectory: '/tmp/build/my-app-64',
    outputDirectory: '/tmp/build/installer64',
    authors: 'My App Inc.',
    exe: 'myapp.exe',
    windowsSign: {
      signWithParams: '--my=custom --parameters',
      // signtool.exe が動作してくれない場合は、カスタマイズしましょう!
      signToolPath: 'C:\\Path\\To\\my-custom-tool.exe'
    }
  })
  console.log('It worked!')
} catch (e) {
  console.log(`No dice: ${e.message}`)
}
すべての設定オプションについては、electron-winstaller リポジトリをご確認ください!
electron-wix-msi (WiX MSI) を使用する
electron-wix-msi は、Electron アプリ向けに MSI のインストーラーを生成するパッケージです。 これは Electron Forge の MSI メーカー で内部的に使用されているツールです。 @electron/packager と同様に、内部では @electron/windows-sign を使用しており、同じ windowsSign のオプションをサポートしています。
import { MSICreator } from 'electron-wix-msi'

// ステップ 1: MSICreator をインスタンス化します
const msiCreator = new MSICreator({
  appDirectory: '/path/to/built/app',
  description: 'My amazing Kitten simulator',
  exe: 'kittens',
  name: 'Kittens',
  manufacturer: 'Kitten Technologies',
  version: '1.1.2',
  outputDirectory: '/path/to/output/folder',
  windowsSign: {
    signWithParams: '--my=custom --parameters',
    // signtool.exe が動作してくれない場合は、カスタマイズしましょう!
    signToolPath: 'C:\\Path\\To\\my-custom-tool.exe'
  }
})

// Step 2: Create a .wxs template file
const supportBinaries = await msiCreator.create()

// 🆕 Step 2a: optionally sign support binaries if you
// sign your binaries as part of your packaging script
for (const binary of supportBinaries) {
  // Binaries are the new stub executable and optionally
  // the Squirrel auto updater.
  await signFile(binary)
}

// ステップ 3: テンプレートを .msi ファイルにコンパイルする
await msiCreator.compile()
全部の構成オプションについては、electron-wix-msi リポジトリをご確認ください!
Electron Builder を使用する
Electron Builder にはアプリケーションに署名するためのカスタムソリューションが付属しています。 そのドキュメントはこちら にあります。
Azure の信頼された署名を使用する
Azure の信頼された署名 は、Microsoft のモダンなクラウドベースの代替 EV 証明書です。 これは Windows でのコード署名の最も安価な選択肢であり、SmartScreen の警告を取り除きます。
2025 年 10 月現在、Azure の信頼された署名は、検証可能な 3 年以上の事業履歴を持つ米国およびカナダに拠点を置く組織と、米国およびカナダの個人開発者が利用できます。 Microsoft は、このプログラムの適用可能範囲をさらに広げる予定です。 後でこれを読んでいる方は、資格基準の変更点を確認することをお勧めします。
Using jsign for Azure Trusted Signing
For developers on Linux or macOS, jsign can be used to sign Windows apps via Azure Trusted Signing. 使用例:
jsign --storetype TRUSTEDSIGNING \
      --keystore https://eus.codesigning.azure.net/ \
      --storepass $AZURE_ACCESS_TOKEN \
      --alias trusted-sign-acct/AppName \
      --tsaurl http://timestamp.acs.microsoft.com/ \
      --tsmode RFC3161 \
      --replace <file>
Electron Forge を使用する
アプリだけでなく Squirrel.Windows と WiX MSI のインストーラーも署名するのであれば、Electron Forge を推奨します。 Azure の信頼された署名の手順については、こちら をご覧ください。
Electron Builder を使用する
Azure の信頼された署名に関する Electron Builder ドキュメントは、こちら にあります。
Windows Store アプリケーションの署名
Windows ストアのガイド を参照してください。